How to create a react native animated splash screen with RNBootsplash
February 19, 2023

When working with react-native and mobile development one common problem is how to create an animated splash screen, in react-native, react-native-bootsplash is often used to create splash screens, another well know package is react native-splash screen but we won’t be covring it in the tutorial. In this tutorial am going to show you how to create an animated splash screen in react-native using react-native bootsplash which is an open-source package for creating splash screens on android and IOS.
Here’s what we’ll cover:
- What is a splash screen and what are some examples?
- Building a React Native animated splash screen
- Add animations on the splash screen
What is a splash screen and some examples?
A splash screen is a window or an image that appears when the application or website is starting or loading, A typical splash screen displays the logo at its start but in some cases, it displays some different kinds of animations. On a website, the splash is commonly materialized as a frontend page that just introduces the website while on the mobile side, it’s a typical a logo or an animation with a loader animation.
Some advantages of a splash screen are as follows :
Feedback provision: Splash screen help provide feedback such as no internet connection or if the application is not available for the moment.
Insalizating Application: The splash screen can keep the user occupied while getting important information about the application which is used to help the application work properly.
Brand retention: Including brand elements in the splash screen helps in promoting brand retention in the user thereby increasing the chance of users coming back.
Building a React Native animated splash screen
After defining what is a splash screen and it used in the web and mobile space we shall start with the proper development
I. Creating a react-native project and installing react-native bootsplash
We shall start by creating a new react-native project for the purpose of this tutorial I shall name the project BootsplashExample if you have already installed react-native you can skip to the next section [link to section].
Now let’s install react-native with the following command assuming you already configured it if not follow this tutorial.
npx react-native init BootsplashExampleAfter that you the project has been installed the next step is to install the dependencies
yarn install Now open your editor and you should be able to see something similar to this

Assuming everything is fine now the next step is to add react-native bootsplash to our project to do that we run the following command.
yarn add react-native-bootsplashThe commands adds the package react-native-bootsplash npm to your node modules. After that has been done we can start configuring the assets, since react-native auto-linking automatically links the package.
II. Configuring the assets and React-native Bootsplash
React-native bootsplash comes with an assets manager (react-native generate-bootsplash) which helps you to be able easily to configure the splash screen to access the assets too you try the following command.
yarn react-native generate-bootsplash --helpThe result of the command should be something as follows

I will be using the kawlo logo as an example for this tutorial, feel free to use any image you want, start by placing the image in the asset folder in the root folder.
Then you need to run the following command in your terminal
yarn react-native generate-bootsplash assets/logo.png \
  --background-color=000000 \
  --logo-width=100 \
  --assets-path=assets \
  --flavor=main
After running it, react-native bootsplash will generate the following
- Logo with a width of 100dp
- Background color for the splash screen with color black
- The path for the logo will be in the assets folder
The whole command can be found here.
Now your android assets folder should be as follows.
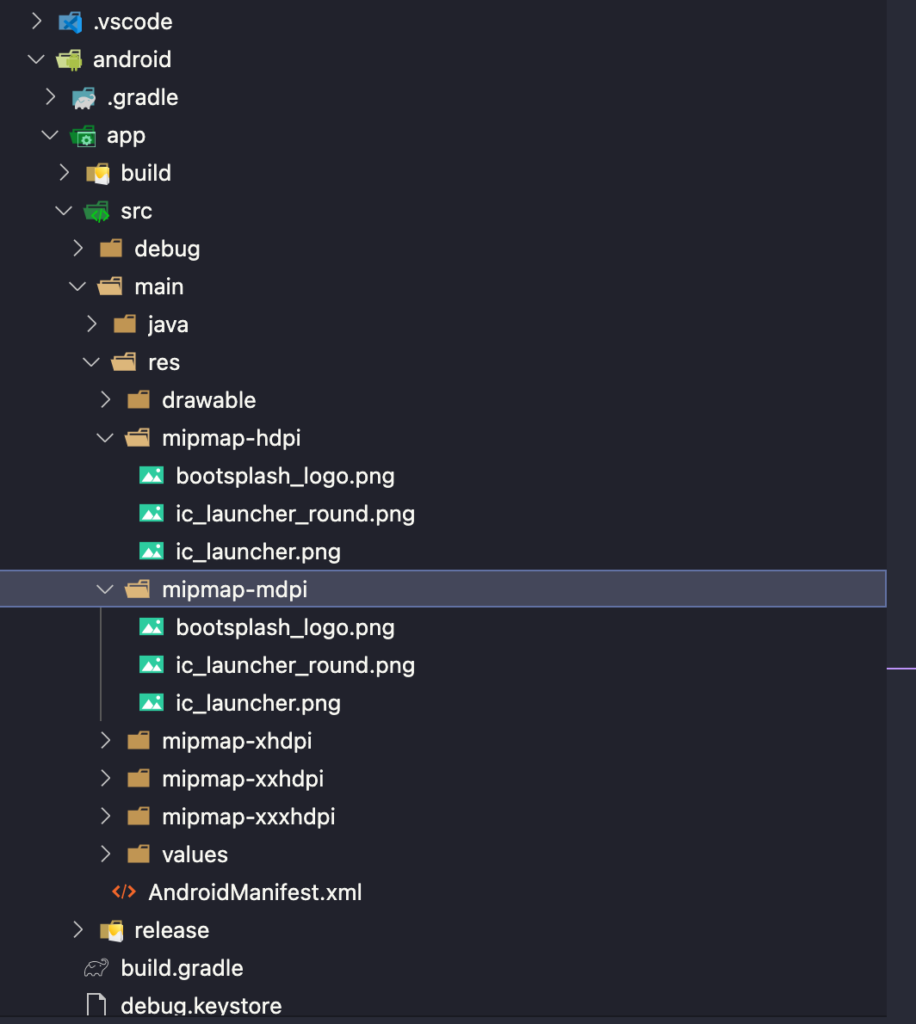
The boostsplash_logo is the access that has been generated from react-native bootsplash.
Now we need to configure some native dependencies to permit the splash screen to display.
Configuration on android
Start by adding this in your android/app/build.gradle
dependencies {
  // ...

  implementation("androidx.swiperefreshlayout:swiperefreshlayout:1.0.0")
  implementation("androidx.core:core-splashscreen:1.0.0") // Add this line

  // ...
For android configuration head to the android/app/src/main/res/values/styles.xml
Modify the styles as follows
<resources>

  <style name="AppTheme" parent="Theme.AppCompat.DayNight.NoActionBar">
      <!-- Your base theme customization -->
  </style>

  <!-- BootTheme should inherit from Theme.SplashScreen -->
  <style name="BootTheme" parent="Theme.SplashScreen">
    <item name="windowSplashScreenBackground">@color/bootsplash_background</item>
    <item name="windowSplashScreenAnimatedIcon">@mipmap/bootsplash_logo</item>
    <item name="postSplashScreenTheme">@style/AppTheme</item>
  </style>

</resources>
Note: that the name bootsplash_logo should correspond to the name generated by react-native bootsplash.
After that head to android/app/src/main/AndroidManifest.xml and modify it as follow
<manifest xmlns:android="http://schemas.android.com/apk/res/android"
  package="com.rnbootsplash">

  <!-- ... -->

  <application
    android:name=".MainApplication"
    android:label="@string/app_name"
    android:icon="@mipmap/ic_launcher"
    android:roundIcon="@mipmap/ic_launcher_round"
    android:allowBackup="false"
    android:theme="@style/BootTheme"> <!-- Replace @style/AppTheme with @style/BootTheme -->
    <!-- ... -->
  </application>
</manifest>
Finally, head to android/app/src/main/java/com/yourprojectname/MainActivity.java and edit to be the same as this
import android.os.Bundle;
import com.zoontek.rnbootsplash.RNBootSplash;

public class MainActivity extends ReactActivity {

  // ...

  @Override
  protected void onCreate(Bundle savedInstanceState) {
    RNBootSplash.init(this); // <- initialize the splash screen
    super.onCreate(savedInstanceState); // or super.onCreate(null) with react-native-screens
  }
}
Now that the configuration is over we will modify our App.tsx file as follows
/**
* Sample React Native App
* https://github.com/facebook/react-native
*
* @format
*/


import React, {useEffect} from 'react';
import {SafeAreaView, StatusBar, useColorScheme} from 'react-native';
import RNBootSplash from 'react-native-bootsplash';
import {Colors} from 'react-native/Libraries/NewAppScreen';


function App(): JSX.Element {
 const isDarkMode = useColorScheme() === 'dark';


 const backgroundStyle = {
   backgroundColor: isDarkMode ? Colors.darker : Colors.lighter,
 };


 useEffect(() => {
   const init = async () => {};


   init().finally(async () => {
     await RNBootSplash.hide(); // hide Bootsplash
   });
 }, []);


 return (
   <SafeAreaView style={backgroundStyle}>
     <StatusBar
       barStyle={isDarkMode ? 'light-content' : 'dark-content'}
       backgroundColor={backgroundStyle.backgroundColor}
     />
   </SafeAreaView>
 );
}

export default App;
Now it’s time to make sure everything work as expected, disconnect your application and lunch it once more using yarn android.
We should have something as follows

Add animations on splash screen
Now it’s time to add the different kind of animations react-native-bootsplash comes with 2 different kinds of ways to configure animation that is fade and duration, you can configure them as follow, fade is the default animation used while duration is the time for the animation to last, to try it modify you App.tsx as follow.
/**
* Sample React Native App
* https://github.com/facebook/react-native
*
* @format
*/


import React, {useEffect} from 'react';
import {SafeAreaView, StatusBar, useColorScheme} from 'react-native';
import RNBootSplash from 'react-native-bootsplash';
import {Colors} from 'react-native/Libraries/NewAppScreen';


function App(): JSX.Element {
 const isDarkMode = useColorScheme() === 'dark';


 const backgroundStyle = {
   backgroundColor: isDarkMode ? Colors.darker : Colors.lighter,
 };


 useEffect(() => {
   const init = async () => {};


   init().finally(async () => {
     await RNBootSplash.hide({fade: true, duration: 500}); // add animation
   });
 }, []);


 return (
   <SafeAreaView style={backgroundStyle}>
     <StatusBar
       barStyle={isDarkMode ? 'light-content' : 'dark-content'}
       backgroundColor={backgroundStyle.backgroundColor}
     />
   </SafeAreaView>
 );
}


export default App;
If you did everything right you should be able to have the same as the following

Conclusion
In this tutorial we explored how to configure a splash screen in react-native with react-native bootsplash, we saw you configure the splash screen on android and how we can add animation, my example project can be found on GitHub, if you are instresested in react-native bootsplash dark mode you can read the documentation for more details.
If you have any questions feel free to ask them in the comments.
lewatt23
Stanly is a web and mobile developer passionate about creating engaging and user-friendly digital experiences. he has 4+ years building web and mobile applications.
Related Posts
You may also like